Please check out my new blog @

Going Beyond Windows.....

Sunday, November 27, 2011

ICS Beta1 for Samsung Galaxy S GT I9000

The most recent development in the Ice Cream Sandwich (Android 4.0) is that XDA Developers have been successful in releasing the Beta update for Samsung Galaxy S GT I9000.

Warning: This release is only for the International version of SGS GTI9000

Any one interested in installing the beta ROM on their devices can download the ROM & Kernel from here.

In case your phone is not rooted, you need to root i

t first. (Warning: Rooting as well as installing this ICS update will void your warranty)

In order to install theICS you need to first ensure that you have the latest superuser 3.0.6 installed on your rooted device. You can get the superuser from here.


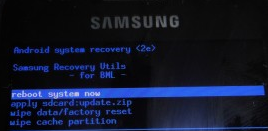
Once you have downloaded the superuser and copied it to the root folder in the sdcard, switch off your device, enter into recovery mode by pressing the Volume Up, Power off and Home key at the same time. Then, navigate to the "Install zip from sdcard" option. In this, navigate to the "Choose zip from sdcard" option and select the Superuser-3.0.6-efgh-signed.zip file and flash it.


Next, copy both the rom and kernel files to the root folder of your phone and do as follows:
If all the above instructions are followed correctly, you should be able to run ICS smoothly on your device.

Thursday, November 24, 2011

Unblock Hidden Chat Emotions in Gmail Chat

We all are familiar with the chat emotions provided in the gmail chat box that can be selected from the drop-down list. But here are some of the hidden char emotions that you can try out the next time you are chatting with your friends and amaze them!!!
  • :3 (cat) :3
  • :(:) (pig) :(:)
  • :(|) (monkey) :(|)
  • V.v.V (crab) V.v.V
  • -<@% (bumblebee) -<@%
  • +/'\ (cowbell) +/'\
  • [:|] (robot)
  • }:-) (devil) }:-)
  • \m/ (rock out) \m/
  • <3 (heart) <3

Wednesday, November 23, 2011

Tips: RUN commands

We all know that Windows logo key + R leads us to the RUN command box and we have been using quite a few commands like msconfig, cmd, notepad etc… as a shortcut to open the applications quickly without having to locate them in their respective directories. So, here is the list of all the commands you can execute in Run and access various applications:

A

Add/Remove Programs = appwiz.cpl

Administrative Tools = control admintools

Authorization Manager= azman.msc "New"

C


Calculator = calc

Certificate Manager = certmgr.msc

Character Map = charmap

Check Disk Utility = chkdsk

Control Panel = control "New"

Command Prompt = cmd.exe

Component Services = dcomcnfg

Computer Management = compmgmt.msc = CompMgmtLauncher "New"

D

Date and Time Properties = timedate.cpl

Downloads = Downloads "New"

Device Manager = devmgmt.msc

Direct X Troubleshooter = dxdiag

Disk Cleanup Utility = cleanmgr

Defragment User Interface = dfrgui "New"

Ditilizer Calibration Tool = tabcal "New"

Disk Management = diskmgmt.msc

Disk Parmelonion Manager = diskpart

Display Properties = control desktop or desk.cpl

DPI Scaling = dpiscaling "New"

Driver Package Installer = dpinst "New"

Driver Verifier Utility = verifier or /reset

DVD Player = dvdplay "New"

E

Encryption File System = rekeywiz "New"

Event Viewer = eventvwr.msc

F

Fax Cover Sheet Editor = fxscover "New"

File Signature Verification Tool = sigverif

Folders Properties = control folders

Fonts = control fonts

Free Cell Card Game = freecell

G

Group Policy Editor = gpedit.msc

I

Internet Explorer = iexplore

Iexpress Wizard = iexpress

Internet Properties = inetcpl.cpl

IP Configuration = ipconfig.exe

iSCSI Initiator = iscsicpl "New"

J

Keyboard Properties = control keyboard

L

Libraries = explorer or Windows key + E

Local Security Settings = secpol.msc

Local Users and Groups = lusrmgr.msc

Logs You Out Of Windows = logoff

M

Microsoft Support Diagnostic Tool = msdt "New"

Microsoft Paint = mspaint.exe

Mouse Properties = control mouse

Mouse Properties = main.cpl

Mobility Center (only on mobile) = mblctr or Windows key + X

Network Connections = control netconnections

Network Connections = ncpa.cpl

Notepad = notepad

O

ODBC Data Source Administrator = odbcad32 "New"

Optional Features Manager = optionalfeatures "New"

On Screen Keyboard = osk or Windows key + U

P

Performance Monitor = perfmon.msc

Phone and Modem Options = telephon.cpl

Power Configuration = powercfg.cpl

Printers and Faxes = control printers

Printer Migration = PrintBrmUi "New"

Private Character Editor = eudcedit

R

Regional Settings = intl.cpl

Registry Editor = regedit.exe

Remote Assistance = msra "New"

Remote Desktop = mstsc

Resultant Set of Policy = rsop.msc

S

Scheduled Tasks = control schedtasks

Security Center = wscui.cpl

Services = services.msc

Shared Folders/MMC = fsmgmt.msc

Shuts Down Windows = shutdown

Snipping Tool = snippingtool "New"

Sounds and Audio = mmsys.cpl

Sound Recorder = soundrecorder "New"

Sound Volume = sndvol "New"

Spider Solitare Card Game = spider

SQL Client Configuration = cliconfg

Stored User Names and Passwords = credwiz "New"

Sticky Note = StikyNot "New"

System Configuration Editor = sysedit

System Configuration Utility = msconfig

System File Checker Utility = sfc

System Information = msinfo32

System Properties = sysdm.cpl or Windows key + Pause/Break

T

Task Manager = taskmgr

Trusted Platform Module = TpmInit "New"

U

Utility Manager = utilman

User Accounts = netplwiz or control userpasswords2

W

Windows Activation = slui "New"

Windows Backup Utility = sdclt "New"

Windows Fax and Scan = wfs "New"

Windows Firewall = firewall.cpl

Windows Firewall with Advanced Security = wf.msc "New"

Windows Image Acquisition = wiaacmgr "New"

Windows Media Player = wmplayer

Windows Magnifier = magnify

Windows Management Infrastructure = wmimgmt.msc

Windows Update App Manager = wuapp "New"

Windows Standalong Update Manager = wusa "New'

Windows System Security Tool = syskey

Windows Share Creation Wizard = shrpubw "New"

Wordpad = write
Friday, October 28, 2011

Learn How To Break Into A Windows PC

In order to prevent someone from breaking into your Windows PC, the first thing to do is understand how one breaks in!! There are several ways of breaking in which I shall take you through step by step:
Command-Line Method: Reset the Password with the System Rescue CD

The Linux-based System Rescue CD is a good option for breaking in when one needs not only to access the files on the PC but also the Operating System itself. In this method, one needs to do a bit of command line work, but as long as the instructions are followed closely it should be fine.
Steps:
1.      Download the .iso file for the System Rescue Live CD and burn it to disc.
2.      Boot from the disc and hit the default option when the blue screen comes up.
3.      After everything loads and you're presented with a command-line interface, type fdisk -l to see the drives and partitions on your computer.
4.      Pick the Windows partition (usually the largest NTFS partition) and note the name, e.g. /dev/abc.
Then, run the following command:
ntfs-3g /dev/abc /mnt/windows –o force
Make sure to replace /dev/abc with the partition you noted earlier.
5.      Next, cd to your Windows/System32/config directory with this command:
cd /mnt/windows/Windows/System32/config
We want to edit the SAM file in this folder, so type the following command to get a list of users:
chntpw –l SAM
Note the username you want to access, and then type the following command, replacing Windows User with the username in question.
chntpw –u "Windows User" SAM
6.      At the next screen, choose the first option by typing the number 1 and hitting Enter. This will clear the user password, making it blank.
7.      When it asks you to write hive files, hit y and press Enter. It should say OK, and then you can type reboot to reboot the computer.
8.      When you boot into Windows, you'll be able to log in to that user's account without a password.
P.S.: You can get a detailed tutorial with screenshots from the How-To Geek website here.
Use a Linux Live CD to Get at the Files
If you need to access just some files and not the OS itself, you don't need to go through much trouble at all. You can grab any Linux live CD and just drag-and drop files onto a USB hard drive, as you would in any other OS.
Steps:
1.      Just download the live .iso file for any Linux distribution (like Ubuntu) and burn it to CD.
2.      Stick it in the computer you want to access and boot up from that CD.
3.      Pick "Try Ubuntu" when it comes up with the first menu, and it should take you right into a desktop environment.
4.      From here, you can access most of the hard drive just by going to the Places menu in the menu bar and choosing the Windows drive. It should see any NTFS drives just fine.
5.      Note that depending on the permissions of some files, you might need root access.
6.      If you're having trouble viewing or copying some files, open up a terminal window (by going to Applications > Accessories > Terminal) and type in gksudo nautilus, leaving the password blank when prompted.
7.      You should now have access to everything.

Thursday, September 15, 2011

Install Windows 8 from USB Pen Drive

With the release of the Windows 8 Developer Preview, my curiosity could not let me wait and I rushed to install it right then. But not having an optical drive on my netbook could hinder my installation and hence I had to come up with this alternative of installing it via a pen drive. And to my surprise, when I tried to make a Windows 8 bootable pen drive using the  Microsoft’s very own Windows 7 USB/DVD Download Tool.

System Requirements for Windows 8 are:
  • 1 Gigahertz or faster 32-bit or 64-bit processor
  • 1 Gigabyte of RAM for 32-bit, 2 Gigabytes of RAM for 64-bit minimum
  • 16 Gigabyte hard drive for 32-bit systems, 20 Gigabyte for 64-bit systems
  • Direct X 9 graphics card

The prerequisits for the installation are as follows:
  • Firstly, you need to download the Microsoft Windows 8 Developer Preview Image from here.
  • Next, you need to have with your self the  Windows 7 USB/DVD Download Tool, which can be downloaded from here.
  • You need an USB pen drive with at least four Gigabytes of free space. 
With both the softwares downloaded we are now ready to make our own bootable pen drive with Windows 8. Though it does require few tweaks other than making the pen drive bootable, you can follow the steps as given below:
Formating the Pen Drive
  • Firstly, we need to format the pen drive to the FAT32 file system. This can be done by connecting the pen drive to the computer, right-clicking its drive icon and selecting Format from the drop down menu. The Format window pops up where you need to make sure that Fat32 is the selected file system. Other details need not be changed.
  • Once this is done, open the Windows 7 USB/DVD Download Tool.
  • Then just select the Windows 8 ISO when asked to pick an ISO image from the computer.
  • Next, select to copy the contents to an USB drive. The program will copy all files to the drive and make that drive bootable at the same time.
  •  Once this is done, restart your PC, get into the BIOS by pressing F8/F12 as per your manufacturer and goto the Boot Configuration section and enable the USB Booting as well as make USB Booting primary in the booting preference.
  • Save the settings and exit the BIOS.
  • On restart, the computer should now automatically boot through the pen drive and begin the installation.
 

Popular Posts